Today I was the victim of a verbal assault. Okay, that's not totally true. Actually, it's not even remotely true, but a guy said something to me in the grocery store aisle that hit me like a slap to the face. What spiteful thing could have possibly been so hurtful? He said, "Oh, excuse me, ma'am."
It wasn't so much the "ma'am" that did it. I live in the South- I've been called ma'am with some regularity since I was 14. It was the speed with which this college-age guy said it. It was an automatic ma'am, which means I officially look old enough to warrant an instant, old-lady, ma'am. Ouch.
When did that happen? I mean, sure I'm poking 40 with a VERY short stick, but I'm still cool!! Nevermind that my shopping cart contained wrinkle cream and hair dye to cover all my gray, I am young and fabulous! I went to a rock show last night! On a TUESDAY! I didn't get home until AFTER MIDNIGHT! So what if my knees hurt today and I could barely drag myself out of bed this morning? I am a happening chick, not some dowdy old ma'am.
But the whole thing did make me wonder, when do you start feeling your age? I have all the trappings of adulthood- marriage, house, kids, minivan, but I still feel like the same person I was at 20. When do I become a proper matron? Will I exchange my ponytail for a beauty shop rinse and set? Will I phase out graphic t-shirts and retro dresses in favor of a sensible pantsuit? Will I stop swearing like a sailor???
I don't know, and I guess only time will tell. But I can say this for certain, the generation ahead of me, my parents and their pals, give me great hope. They're cool. They're pushing 60 or more, and they're cooler than me! Better dressed, better social lives, better travels- they are doing life right. So while I may officially be "ma'am," I'm not hanging it up yet. And when you see me in 45 years, I really hope I look like this.
Wednesday, April 26, 2017
Monday, April 24, 2017
You Should Make this for Dinner Tonight
It's been rainy and cool the past couple of days. And I don't know about you, but the only thing I want to eat when it's rainy and cool is grilled cheese and tomato soup. And sure, you can crack open a can of Campbell's, and throw some Kraft singles on some Wonder bread (I'm not knocking it- that's delicious!), or you could get a little fancier. We picked fancier tonight.
Tomato soup, man, that stuff is the nectar of the Gods. And while I have eaten many varieties in many places, this recipe remains my perennial favorite. It's not my recipe, so I don't have to type it out. I can just give you this handy dandy link, and you can thank Mrs. Ree Drummond for that treasure. http://thepioneerwoman.com/cooking/sherried_tomato_soup/
Now let's get to the real deal- the grilled cheese. The jalapeno popper grilled cheese, to be exact. I don't know where this recipe comes from because I got it from my sister, and she got it from...somewhere. So, sorry if I'm I'm infringing on someone's copyright. Just take it as a compliment, because your sandwich is delicious.
There are several ways to go about this. My sister uses roasted jalapenos in hers. I don't because I like to keep my tastebuds unseared, but you do you. If you like it super spicy, substitute jalapenos for poblanos. But please, for the love of God, use gloves when you are peeling and de-seeding them. And if you don't, DO NOT touch your eyes, nose, or other sensitive bits. And if you do that, well, you're dumb.
Without further ado, Jalapeno Popper Grilled Cheese!!
(Serves 4-ish)
Ingredients:
2-3 poblano peppers (or 6-8 jalapenos if you're brave)
jalapeno cream cheese
apricot jam
sharp cheddar cheese
good sandwich bread
1. Roast the peppers on a foil-covered cookie sheet under your oven broiler. Turn them a quarter turn about every five minutes until the skin is blackened on all sides. Put them in a large ziplock bag and let them cool. Then you'll be able to slide the skins off easily. Cut off the tops, scrape out the seeds, and slice them into strips.
2. Time to assemble!! Spread one slice of the bread with the apricot jam (I know it sounds weird, but trust me). The other slice gets a good layer of jalapeno cream cheese. Top with sliced peppers and a slice of cheddar cheese. Put them together, and grill that sucker in a buttered skillet to golden brown, melty perfection.
It will be spicy and sweet and gooey and wonderful. Eat until you are so full you want to die a little bit. Then go call your sister and ask her what she made for dinner.
Photo credit- Ryan Bray- tattoo artist extraordinaire
Monday, April 17, 2017
Cleaning Up the Laundry Room/ Extreme Hutch Makeover
I don't know about you, but I spend a LOT of time in my laundry room. And it's the first room you see if you come in through the garage. So despite the fact that it's utilitarian in purpose, there's no reason it shouldn't be cute. When we bought our house, the laundry room was not cute- it was orange. Very, very orange. I'm not opposed to orange as a pop of color in a room, but the entire room? Yikes.
The laundry room was pretty far down the project list, but once I got the majority of the major rooms painted, I covered the eye-searing orange with a light, calming, greeny-blue. (Sea Salt by Sherwin Williams). We added some shoe storage cubbies, hooks for backpacks, and wire shelving for necessities like toilet paper, and light bulbs. It was functional, but it wasn't pretty.
After several months of living with it, I decided the wire shelves were the problem. Who wants to look at your bulk rolls of paper towels as soon as they walk in the door? The obvious solution was a charming hutch to hide all those unattractive necessities. I really wanted an antique Hoosier cabinet, but all the ones I found vastly exceeded the laundry room budget. I kept searching because I may be cheap, but I'm also tenacious.
I found this promising little gem on Facebook marketplace. At $40, I was willing to put aside my fears of being murdered Craigslist-style, so my husband and I drove the 40 miles to our old hometown to procure my treasure,
It was a super easy, murder-free transaction, and within two hours I had a big, cheap hutch in my laundry room. It wasn't cute, but I had plans. Unfortunately, I also had 10 other projects going, so it had to wait awhile. It sat in the laundry room for a couple of months, looking kind of blah, but hiding the toilet paper! Last week, after finally finishing the kitchen, it was time for Extreme Hutch Makeover!
The main problem with this piece is that it wasn't solid wood. It's MDF covered with laminate. But I wasn't worried because I've tackled this before. I had two options for paint. The first was chalk paint because it sticks to anything. But it's pricey, and I didn't want to spend as much on paint as I had for the hutch. So I went with option B- primer and paint. I already had a can of Kilz, and I knew I could get by with a $6 sample can of paint. I'd tried this method a couple of years ago with a Goodwill cabinet and it worked amazingly well and has held up nicely.
I decided to be thorough, and apply two coats of primer for maximum stickability. I followed that with two coats of paint in a color I had been dying to use in my house (Drizzle by Sherwin Williams). I had planned to paint the living room this color, but it was just too dark. And while it was too much for any of my rooms, it was perfect for a piece of furniture! Since I knew the hutch would get some dings with a laundry basket, and would regularly be heaped with tools, craft supplies and other flotsam and jetsom, I applied a coat of Minwax clear polycrylic for protection.
I wanted to cover the glass doors so lovely things like my crockpot and cake carriers weren't immediately visible. I had thought I'd use some fabric, but I couldn't find a print that I loved. Then I stumbled across this roll of cool wrapping paper at Marshalls.
It's great, heavy paper, and I have a thing for globes. (Ugh, I know, so trendy.) All it took was a piece of foam core poster board cut to the size of the glass. I wrapped the paper around it like a present and wedged the foam core into the inside frame of the door. I didn't even have to use anything to secure it because it squeezed in there just as snug as could be. And if I get tired of the paper, or want to change it seasonally, it will be a cinch to pop it out and fix it up.
I found these utterly delightful globe knobs at Hobby Lobby, and snatched them up despite the fact that they weren't on sale. I found some weathered turquoise pulls that I liked for the doors, but I managed to hold off on those until they are half off this week!
So the laundry room is finished-ish. I still want to replace the wire shelving above the washer and dryer with cabinets, but I'm waiting until I find some for next-to-nothing at Habitat Re-Store. In the meantime, I'm enjoying having closed storage and a room that is not clown orange!
The laundry room was pretty far down the project list, but once I got the majority of the major rooms painted, I covered the eye-searing orange with a light, calming, greeny-blue. (Sea Salt by Sherwin Williams). We added some shoe storage cubbies, hooks for backpacks, and wire shelving for necessities like toilet paper, and light bulbs. It was functional, but it wasn't pretty.
After several months of living with it, I decided the wire shelves were the problem. Who wants to look at your bulk rolls of paper towels as soon as they walk in the door? The obvious solution was a charming hutch to hide all those unattractive necessities. I really wanted an antique Hoosier cabinet, but all the ones I found vastly exceeded the laundry room budget. I kept searching because I may be cheap, but I'm also tenacious.
I found this promising little gem on Facebook marketplace. At $40, I was willing to put aside my fears of being murdered Craigslist-style, so my husband and I drove the 40 miles to our old hometown to procure my treasure,
It was a super easy, murder-free transaction, and within two hours I had a big, cheap hutch in my laundry room. It wasn't cute, but I had plans. Unfortunately, I also had 10 other projects going, so it had to wait awhile. It sat in the laundry room for a couple of months, looking kind of blah, but hiding the toilet paper! Last week, after finally finishing the kitchen, it was time for Extreme Hutch Makeover!
The main problem with this piece is that it wasn't solid wood. It's MDF covered with laminate. But I wasn't worried because I've tackled this before. I had two options for paint. The first was chalk paint because it sticks to anything. But it's pricey, and I didn't want to spend as much on paint as I had for the hutch. So I went with option B- primer and paint. I already had a can of Kilz, and I knew I could get by with a $6 sample can of paint. I'd tried this method a couple of years ago with a Goodwill cabinet and it worked amazingly well and has held up nicely.
I decided to be thorough, and apply two coats of primer for maximum stickability. I followed that with two coats of paint in a color I had been dying to use in my house (Drizzle by Sherwin Williams). I had planned to paint the living room this color, but it was just too dark. And while it was too much for any of my rooms, it was perfect for a piece of furniture! Since I knew the hutch would get some dings with a laundry basket, and would regularly be heaped with tools, craft supplies and other flotsam and jetsom, I applied a coat of Minwax clear polycrylic for protection.
I wanted to cover the glass doors so lovely things like my crockpot and cake carriers weren't immediately visible. I had thought I'd use some fabric, but I couldn't find a print that I loved. Then I stumbled across this roll of cool wrapping paper at Marshalls.
It's great, heavy paper, and I have a thing for globes. (Ugh, I know, so trendy.) All it took was a piece of foam core poster board cut to the size of the glass. I wrapped the paper around it like a present and wedged the foam core into the inside frame of the door. I didn't even have to use anything to secure it because it squeezed in there just as snug as could be. And if I get tired of the paper, or want to change it seasonally, it will be a cinch to pop it out and fix it up.
I found these utterly delightful globe knobs at Hobby Lobby, and snatched them up despite the fact that they weren't on sale. I found some weathered turquoise pulls that I liked for the doors, but I managed to hold off on those until they are half off this week!
So the laundry room is finished-ish. I still want to replace the wire shelving above the washer and dryer with cabinets, but I'm waiting until I find some for next-to-nothing at Habitat Re-Store. In the meantime, I'm enjoying having closed storage and a room that is not clown orange!
Tuesday, April 4, 2017
See You in Hell, Popcorn
Are we finally done with the cabinets? No. No, we are not. We are mostly done- so very, very close to being done, but we're not there yet and I blame my husband for that.
This weekend was supposed to be easy. We were going to finish up the last part of the cabinet overhaul and spend the rest of the weekend taking it easy. But then my husband got up Saturday morning, and before he'd even finished his first cup of coffee, he decided he could not live with the hideous popcorn ceiling one more second, and started scraping it off. That launched the project from Hell that consumed our entire weekend. It started like this...
And quickly became this...
This weekend was supposed to be easy. We were going to finish up the last part of the cabinet overhaul and spend the rest of the weekend taking it easy. But then my husband got up Saturday morning, and before he'd even finished his first cup of coffee, he decided he could not live with the hideous popcorn ceiling one more second, and started scraping it off. That launched the project from Hell that consumed our entire weekend. It started like this...
And quickly became this...
I have to take a tiny bit of the blame. Last week, one of the guys that's been working on our house since ToiletFlood 2017 (another saga for another day) came to attempt to hang my foyer light fixture for the third time (yup, a saga in and of itself.). He casually mentioned that scraping popcorn ceilings was "easy," I casually mentioned that to Matt, and this is where we wound up.
And I'll admit, scraping the popcorn off is, in fact, quite easy. Resurfacing and sanding the ceiling is a special type of horrible that I do not recommend ever undertaking without the help of professionals. Seriously, y'all, it was awful and I am unlikely to ever get the sheetrock dust out of my house despite our containment-room precautions.
The other problem is that my husband has no previous experience resurfacing ceilings, so there are some...flaws. But honest to God, I don't even care. It looks 50 million times better than the previous dirty cottage cheese look, and who spends that much time inspecting your ceiling? We'll live with it because I cannot bear another round of plastic sheeting, skim coating, sanding and painting. Nuh uh, no way, can't make me!!! So the ceiling is done. Too bad it's only half the kitchen, and the dining area awaits! But that is my husband's problem, not mine, so back to the cabinets.
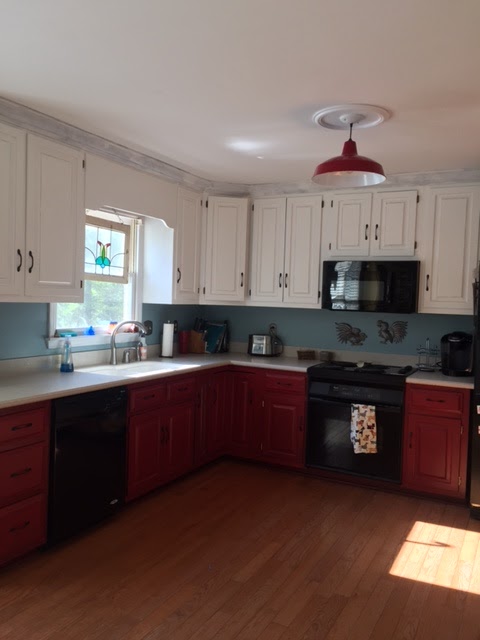
SO close to done!!! I'm finishing up the last two above the fridge, and I have to paint all the crown molding, but that's it. And they're gorgeous! The upper cabinets are painted with Amy Howard chalk paint in Ballet White, and lightly sanded.
The lowers are painted in Amy Howard chalk paint, color-matched to Sherwin William's antique red. I painted two coats of the red, then covered them with a black wash made of black craft paint and water. I painted it on, let it sit a minute, then wiped it off. It toned down the red, and gave them the aged "old barn" look I was going for.
That's a tiny piece of paper on the floor, not an
old french fry. Though it could easily be an old fry.
It just happens to be paper this time.
I didn't sand the edges of the bottom cabinets because I didn't want to get too rustic. I finished them off with a coat of minwax polycrylic in clear satin, and new handles, and I LOVE THEM. The black appliances that I can't afford to replace blend in nicely, and I love my very patriotic red and white cabinets against the blue walls.The final upgrade was taking down the dusty, greasy old ceiling fan, and trading it for a simple warehouse pendant fixture that I spray painted cherry red.
The end of cabinet chaos is finally in sight. I'm bound and determined to have it finished before the weekend, despit the fact that it's spring break, and I have the cold from hell. But I've got to get this one finished so I can move on to the next one!!!
Monday, March 27, 2017
A Cabinet Update, and a Project That's Actually Finished
You may be wondering how we're coming on the cabinets. Well, we're getting there, very slowly, but getting there. The upper cabinets and cabinet frame are painted, they got a coat of polycrylic this morning, and they are currently spread all around the kitchen drying.
So while I'm still toiling away on the cabinets, I figured I'd share a project that's actually complete! If you read my post about the Peaches to the Beaches yard sale, you already know that it was a total bust, and I only bought one thing- a mantel. I'd been looking for one for our master bedroom to go under our ridiculously huge tv that I publicly disdain but secretly love. We had a long bookshelf there, but I wasn't loving it. And I love mantels- so many decorating possibilities!!!
We cut out a plywood frame that we stapled to the back of the surround. I glued the tiles on that. Then, we stapled the decorative screen (spray painted white) to the back of the plywood. It wasn't quite opaque enough, so we added another screen with a smaller pattern behind it.I made a hearth by staining a 6' length of 1x12. I had to fill a few holes in the mantel with wood putty, gave it a fresh coat of white paint, and painted the three panels the same color as our walls (Copen Blue by Sherwin Williams)
We attached it to the wall, slid the "hearth" underneath it, and began disguising all the cords. Luckily the columns of the surround are hollow, so there was plenty of cord-stashing room. And I used the leftover decorative metal screen to create a handy-dandy disguise for our cable box. A strategically placed framed picture hides the tv power cord until we eventually run it behind the wall, and I finally have a place to display my awesome ginger jars that I scored at an estate sale.
,
Are we having fun yet?
I'm really pleased with the paint so far. The finish isn't perfect by any means, and if you want a super-smooth factory finish, this is not the project for you. But I don't mind the little blemishes. In fact, to make it look a bit more intentional, I lightly sanded the beveled edges of the cabinets to give them a bit of a rustic look.
Intentionally crappy!
Now, I'll be the first to say, rustic is just about done to death, so that may wind up being the thing that makes them look dated more quickly. But for now, it's a good way to work with the problems that chalk paint presents. And hey, maybe by the time I'm sick of them, we'll be able to afford to pay someone to do them properly!So while I'm still toiling away on the cabinets, I figured I'd share a project that's actually complete! If you read my post about the Peaches to the Beaches yard sale, you already know that it was a total bust, and I only bought one thing- a mantel. I'd been looking for one for our master bedroom to go under our ridiculously huge tv that I publicly disdain but secretly love. We had a long bookshelf there, but I wasn't loving it. And I love mantels- so many decorating possibilities!!!
Minivan full of mantel!
I was really excited when I found this one because even though it wasn't antique, it was literally the PERFECT size, it was in decent shape, and it was only $40! But we did have to figure out a way to fill the huge fireplace opening. And we were dealing with the added challenge of an air vent behind it. I found an idea on Pinterest of framing it out with tin tiles, and filling the center with a mirror. Loved the tiles, but I find mirrors kind of creepy (Is that weird?), plus, it would block the aforementioned air vent. So we decided to go with decorative sheet metal screens.We cut out a plywood frame that we stapled to the back of the surround. I glued the tiles on that. Then, we stapled the decorative screen (spray painted white) to the back of the plywood. It wasn't quite opaque enough, so we added another screen with a smaller pattern behind it.I made a hearth by staining a 6' length of 1x12. I had to fill a few holes in the mantel with wood putty, gave it a fresh coat of white paint, and painted the three panels the same color as our walls (Copen Blue by Sherwin Williams)
,
Cable box disguise!
I'm thrilled with the way it turned out. I think it adds some fun architectural interest to the room, and I love any additional display space. Plus, it's really romantic looking, and that's never a bad thing in a master bedroom!Wednesday, March 22, 2017
Finding Balance
Over the years I've had lots of people tell me, "I just don't know how you do it all!" Short answer- I don't. When I start a new project, I hyper-focus on it in true ADHD fashion, and tune out all of the fighting kids, blaring televisions, and incessant requests for snacks. I paint and paint and paint while everything goes to hell around me. The laundry piles up, the house descends into a mildly horrifying level of filth, and the children are seen outdoors in badly mismatched clothes and unbrushed hair (and one of them may or may not have been going commando).
Fact is, I have trouble finding balance. That became glaringly obvious when my eldest interrupted my extreme cabinet makeover yesterday to ask what we were having for dinner. I just gazed at him blankly and thought, "huh, I wonder if we even have any food?" As I was desperately attempting to thaw some half-frozen chicken in the microwave, I realized that I might be verging on out of control.
Part of it is due to my own lack of patience. I just want to get it done and everything else be damned. I also blame HGTV. I've gotten so used to the big reveal at the end of the hour that it seems unfathomable that anything should take longer. So when I tackle a huge, multi-day project, I instinctively work feverishly at it until it's done, and I get my big reveal moment. What can I say? Admiring a finished project is my runner's high. Freshly painted surfaces are my drug of choice. But as with any addiction, there are consequences.
This morning, as soon as my husband and kids were out of the house, I diligently set up my painting station and got to work- and promptly ran out of paint. My immediate instinct was to run to the hardware store to get more (See?? I'm a freakin' DIY junkie!), but then I paused for a moment, looked around, saw the utter chaos that had befallen my house, and put down the paint brush.
It was time to step away and focus on everything I'd been neglecting. I didn't pick up a brush or a roller the rest of the day. I didn't even go buy more paint. I cleaned and shined, and fluffed and folded, and made things generally habitable. I even tackled the boys' disgusting bathroom (I'll spare you the details on that one in case you're eating, or ever want to eat again). I made a full dinner that required no emergency thawing. The children got haircuts. They all have clean clothes and plenty of underwear. Order is restored! For now.
Striking the balance between project mania and basic maternal responsibilities is likely to always be a struggle, but I'll keep trying. After all, a pretty house doesn't count for much if you forget to take care of the people that live in it!
Fact is, I have trouble finding balance. That became glaringly obvious when my eldest interrupted my extreme cabinet makeover yesterday to ask what we were having for dinner. I just gazed at him blankly and thought, "huh, I wonder if we even have any food?" As I was desperately attempting to thaw some half-frozen chicken in the microwave, I realized that I might be verging on out of control.
Part of it is due to my own lack of patience. I just want to get it done and everything else be damned. I also blame HGTV. I've gotten so used to the big reveal at the end of the hour that it seems unfathomable that anything should take longer. So when I tackle a huge, multi-day project, I instinctively work feverishly at it until it's done, and I get my big reveal moment. What can I say? Admiring a finished project is my runner's high. Freshly painted surfaces are my drug of choice. But as with any addiction, there are consequences.
This morning, as soon as my husband and kids were out of the house, I diligently set up my painting station and got to work- and promptly ran out of paint. My immediate instinct was to run to the hardware store to get more (See?? I'm a freakin' DIY junkie!), but then I paused for a moment, looked around, saw the utter chaos that had befallen my house, and put down the paint brush.
It was time to step away and focus on everything I'd been neglecting. I didn't pick up a brush or a roller the rest of the day. I didn't even go buy more paint. I cleaned and shined, and fluffed and folded, and made things generally habitable. I even tackled the boys' disgusting bathroom (I'll spare you the details on that one in case you're eating, or ever want to eat again). I made a full dinner that required no emergency thawing. The children got haircuts. They all have clean clothes and plenty of underwear. Order is restored! For now.
Striking the balance between project mania and basic maternal responsibilities is likely to always be a struggle, but I'll keep trying. After all, a pretty house doesn't count for much if you forget to take care of the people that live in it!
Monday, March 20, 2017
Cabinet Chaos
This is what my kitchen looked like Saturday morning.
This is what my kitchen looks like today.
Yes, friends, I have embarked upon a fool's errand known as painting the cabinets. I've wanted to do it since the day we moved in, but the scope of the project held me back. However, last week, I just snapped. I could not take those dark, dated, scratched-up cabinets one second longer. I also couldn't stomach the thought of sanding nine million cabinets, so I decided to cheat.
I've used Amy Howard one-step chalk paint before, and I've been pleased with the results, so I decided to give the cabinets a go and see what happened. So far, it's been a learning process. I started off using a brush, but it gave me too uneven a finish. So I switched to a small roller meant for flat finish paint, and that was decidedly better.
I also started off trying to paint without taking the cabinets down. I've done it before with a fair amount of success, so I figured I could do it again. I was wrong. Refreshing already white cabinets is one thing. Going from a dark cherry stain to a bright white is a whole different animal. My husband said, "don't you think it would be easier to do this if you take the doors off?" I stubbornly insisted that it wouldn't, but painting with the doors attached was hard and slow.
This morning I grudgingly took the doors off (took me all of 10 minutes), and tried it his way. And dangit, he was right. So much easier, and about a third of the time. Yes, I'm admitting it here, in writing, MY HUSBAND WAS RIGHT AND I WAS WRONG. There, I said it, and I'll never say it again.
I'm hoping to be back later in the week with a full cabinet update. I mean, a girl can dream, right? In the meantime, I'll be toiling away in chaos.
Dark, dated, shiny brass- but clean
This is what my kitchen looks like today.
Arrrrrrrgggghhhhhh!!!
Yes, friends, I have embarked upon a fool's errand known as painting the cabinets. I've wanted to do it since the day we moved in, but the scope of the project held me back. However, last week, I just snapped. I could not take those dark, dated, scratched-up cabinets one second longer. I also couldn't stomach the thought of sanding nine million cabinets, so I decided to cheat.
I've used Amy Howard one-step chalk paint before, and I've been pleased with the results, so I decided to give the cabinets a go and see what happened. So far, it's been a learning process. I started off using a brush, but it gave me too uneven a finish. So I switched to a small roller meant for flat finish paint, and that was decidedly better.
I also started off trying to paint without taking the cabinets down. I've done it before with a fair amount of success, so I figured I could do it again. I was wrong. Refreshing already white cabinets is one thing. Going from a dark cherry stain to a bright white is a whole different animal. My husband said, "don't you think it would be easier to do this if you take the doors off?" I stubbornly insisted that it wouldn't, but painting with the doors attached was hard and slow.
This morning I grudgingly took the doors off (took me all of 10 minutes), and tried it his way. And dangit, he was right. So much easier, and about a third of the time. Yes, I'm admitting it here, in writing, MY HUSBAND WAS RIGHT AND I WAS WRONG. There, I said it, and I'll never say it again.
I'm hoping to be back later in the week with a full cabinet update. I mean, a girl can dream, right? In the meantime, I'll be toiling away in chaos.
Subscribe to:
Posts (Atom)