Thursday, August 24, 2017

This Sucks!!! Part 2

Part 2: The Tale of the Tufted Chair

I have reupholstered plenty of things over the years. Mostly easy chair seats, but I've tackled some tougher things. Shoot, back in college, my best friend and I reupholstered an entire Goodwill couch using nothing but cheap fabric, furniture tacks and a butter knife! So I felt adequately prepared to try something a bit more challenging. Plus, I had recently watched one of those two-minute facebook videos that showed how to recover a chair with a fabric back, so obviously, I knew exactly what I was doing, right?

I found my victim on facebook marketplace. A very traditional, but very dated chair with lots of potential. Just look at that orange velvet!! If that doesn't take you back to Grandma's living room circa 1972, I don't know what would!


After I negotiated the $60 asking price down to $30, I was ready. I bought fabric, foam, a button kit, and some nailhead trim. I carefully removed the original upholstery, taking pictures throughout so I could remember exactly how to put it all back together.


Then it was time for paint. I had some white chalk paint leftover from the kitchen cabinet project, and it has such a quick drying time that I thought it would be perfect for this quick and easy project. I was a little concerned about painting the rattan sides with a brush, but it went better than I expected. I just sort of smushed it in there with a brush, smoothed it out and smoothed out drips on the other side. Three coats later, it was ready for wax. I used minwax paste wax, and my same "smush and spread" technique on the rattan, and everything looked great.

It was time to tuft. First I had to make fabric-covered buttons. I had this easy little kit so it couldn't be that hard, right? Wrong. SO WRONG. It took me at least an hour to make ten of them since the button fronts kept popping off. There was cussing. Lots of cussing.

Once I finally had the buttons done, I covered the cardboard with foam, laid the fabric over it and put a few staples in the back to hold it in place. Then I began the battle to shove the buttons through the fabric and twist the 20 gauge wire to hold it into place. There was cussing, sweating and bleeding. And then a couple of the button fronts popped off after I had them anchored in place!! I was just about ready to say, "Tuft this!" and give up, but I was in too deep.  After I'd wiped the blood off the fabric and repaired as many buttons as I could, I was one button short. Back to the fabric store, grumbling all the way.
 I hate you, stupid lower right button!!


Once the tufting was finally finished to the best of my meager ability, it was time to move on to upholstery. I'll spare you the details of how many times I had to rip out staples and start over again- mostly because I lost count. When I finally got the fabric all stapled on as straight as I could manage, I realized that I had forgotten to put in the layer of cotton batting that goes between the cardboard and the back piece of fabric. D'oh!!
Saggy, wrinkled, and no batting
(shrug)

There was no way I was going back at this point, so I forged ahead. I used nailhead trim to cover the staples and the unfinished edge of fabric. That was fairly easy, and as long as you don't look too closely at the fabric poking through, it looks okay.
See my assistant peeking under the chair?

The hard part was done, right? The seat would be easy-peasy, right? Of course not!!!! I cut the foam, I covered the seat, I put 600 staples in it, and I set it in the chair. It was too small. I had pulled the fabric too tight and compressed the foam too much, and I had about two inches of space around the entire thing. ARRRGGGGGHHHHHH!!!!!!!!!!!!!!

Remove 600 staples, cover it AGAIN, and shove that stupid son of a.... (you get the idea) back in the chair. Still not perfect, but close e-freaking-nough. Once I screwed the seat back down, I realized there was a distinct ridge where the edge of the foam met the wood of the seat, but I just couldn't care anymore.
Ugggghhhhh, why????

It was done, and I learned that a two-minute facebook video does not make you an upholstery expert. I also understand why having something reupholstered is so dang expensive. Y'all, that junk is HARD!! But I did it- sort of. And my husband thought it looked good. In fact, he already put it to use!


It has filled its purpose as a cast-off clothing holder!

But, God as my witness, I will never try tufting again!!!!

Tuesday, August 22, 2017

This Sucks!! Part 1

School is back in session, and I'm back in full project mode!! Since I've been AWOL for about a month, I decided to bring it back in a big way. I'm doing a three-post series this week called This Sucks!!!! It will cover three projects that were SO MUCH HARDER than I ever anticipated. You know how that goes- you start a project all sunshiney and confident, and then, halfway through, you're crying on your kitchen floor wondering what the hell you were thinking? Yeah, those kinds of projects. So join me on my arduous journey of suckage, won't you?

Part 1: The Hooker Ruined My Life

Remember this table? Giant, sturdy dining table made by Hooker Furniture Co. that I bought off Facebook marketplace for a mere $75? Well, that damn thing took over my kitchen and my entire life for TWO FULL WEEKS. "Why?" you might ask, it's just a table... Two words, my friends, oil paint.

Children shown for scale!!

See, I wanted to paint the table white, but I had to find a way to make sure it was durable. Painting it with latex and finishing it with polycrylic was out. I used polycrylic on my previous table and it was a HUGE mistake. Polycrylic is water-based, and it breaks down over time with repeated exposure to water. Think about how often you wipe down your kitchen table. Within a couple of years, my table was permanently sticky because the protective finish had been completely broken down. And trust me, peeling yourself away from the table on a daily basis is unpleasant.

Now, oil-based polyurethane would have held up to the abuse, and if I'd been staining the table, that's what I would have used. But oil-based poly has a tendency to yellow over time, and that is not a good look on a white table. Who wants to put in all that work for something that's going to look dingy in no time flat?

That left only one option- oil-based paint. I haven't used the stuff in about a million years and this project made me remember why. It has its good points- it goes on smoothly and has beautiful coverage, and its rock-hard finish is insanely durable. But oh man, it stinks to high heaven and takes FOREVER to dry. I had to wait a full 24 hours between each coat, and it took three coats for the base and four for the top. And my house REEKED the entire time. We all had headaches, and stuffy noses, and that was with a million fans running.
Disaster zone

It also meant that no one could go near the table for days. And since the table is gigantic, it meant that half of our kitchen was completely off-limits. Eating dinner on the coffee table got old fast. But that just took a week, right? What about the other week?

The chairs. The stupid chairs killed the second week. I had four chairs that I'd bought at a junk store years ago. I had painted them, distressed them, and recovered the seats. But after several years of use, they were more than distressed, they were downright destitute. Plus, I had two chairs I'd bought at Goodwill that had to be re-glued, repainted, and reupholstered.
Time for a facelift!

The original four had to be sanded- which took about two hours per chair. Then they each required three coats of paint- with a day's drying time between every coat. The Goodwill chair had been sanded but needed its three coats as well. (the other Goodwill chair is still sitting in the garage waiting for my husband to re-glue it. Technically, this project isn't even done yet!!) I reupholstered each in a gingham oilcloth, and finally, we could eat dinner in the kitchen again!! Just in the nick of time, because school was starting, and you cannot be without the hub of your kitchen once you have three kids in school.

It's been in use for almost a month now, and it's glorious!!! All spills wipe right up, and water rings just sit, nice as you please, until I get around to wiping them up. I am using placemats to avoid scratches from dishes, but the few we've gotten clean off easily with a magic eraser (without damaging the finish). We've had meals, homework, backpacks and everything else on the table, and it looks perfect. The process totally sucked, but the end result was well worth it.


Stay tuned for the Tale of the Tufted Chair....

Wednesday, July 19, 2017

Thrifty Business aka There's a Hooker in My Garage

Summer is long. And hot. And there are many boys fighting under my feet and occasionally using me as a human shield against an angry brother. Needless to say, these are not conditions that lend themselves well to home-improvement projects. Luckily, it hasn't kept me from another one of my true loves- junkin'.

I've managed to make a few Goodwill trips, and I've hit up my favorite junk shops a couple of times as well. And let me tell you, this has been a summer of treasure. So much treasure in fact, that this entry will be a two-parter. Today we're going to focus on the things I've found in the last 3 weeks, and how I saved my family over $3,000.

A few weekends ago I was helping one of my BFFs look for treasure for her house. She'd done some painting and rearranging and she needed some fun stuff for her walls. We found some awesome stuff, and I only had to threaten her a couple of times to keep her from passing on anything truly amazing. Even though her house was the focus of the day, I managed to find a couple of things. A charming little set of dollhouse furniture (more on that later!) and a delightful little terra cotta watering can. All told, I paid $12. After a date with a can of spraypaint, and a little pot of ivy, this majestic beast now resides in my bedroom.

On this trip, I discovered a charming pair of andirons shaped like labrador retrievers. I thought they would be perfect on my fireplace, but I was trying not to spend money since we were a week away from our annual beach vacation. At $95 they were just more than I could reasonably spend for a non-essential, so I sadly walked away. But I just couldn't get them out of my mind, and I told my husband and my mom that I wanted somebody to buy me those dogs for my birthday. My mom said she'd be glad to, so despite the fact that my birthday is a full month away, I raced back to the store the day after we returned from the beach, praying the whole way that the store would be open and nobody would have snatched up my treasure.

Success!!! The weird little decrepit store, stuck behind a gas station and filled with a random assortment of stuff and an entire room of old stereo equipment was open, and my dogs were patiently waiting for me. I joyfully snatched them up- well, more carefully than joyfully, these guys are cast iron and they are HEAVY!!! Upon getting them home, I did a little research. They were made in the 1950s by the Liberty Foy Foundry in St. Louis. And I found a few of them listed for sale ranging from $450-$1900!!! SCORE!!!!


Meet Greenberry and Woodberry! (they're family names) Should you happen to own a pair of these and find yourself on hard times, I'd strongly advise you to put those puppies (ha!) on eBay or One Kings Lane. I mean, look at this!!

I figured nothing could top a find like that, but I was wrong. I've been perusing Facebook marketplace regularly, and I've found some great things. Yesterday I stumbled across a lovely kitchen table priced at only $100. The seller agreed to a final price of $75, and I quickly dispatched my husband and my dad to fetch my newest prize. They returned with a very large, VERY heavy table made by Hooker furniture. (See what I did there?) We looked it up, and sure enough, it's still in production and retails for around $1900.


Now, this particular Hooker would not go for $1900. She's seen better days, been used hard, taken a beating or two (too far?), but she's got a lot of life left in her.
Ignore the dust and sandpaper!

She's got great legs!!

 She's missing her leaves, so I'm on a quest to buy/make/have made some replacements. And the veneer is missing in a couple of places, but I don't mind. That just made my design decision of stain vs. paint easier. I could probably figure out how to fix the veneer, but I don't really want to, so paint it is!!!

For now, there's a cheap, old Hooker in my garage taking up my husband's parking space, but I'm hoping to move her indoors soon. Once I give her a good sanding, I'll bring her in for a paint job and we'll finally have a table big enough for our family. And, if you've been keeping up with the math, you can see that I saved my family tons of money by spending $170. Because we definitely would have spent $3800 on cast iron dogs, and tables....

Stay tuned to hear about the most amazing Goodwill find OF ALL TIME. Seriously- it's proof that Jesus loves me and there is a Santa Clause.

Tuesday, June 20, 2017

From Blah to....Less Blah

It's summer, so there's not a ton happening on the home improvement front. Luckily, I have a few projects that are in a semi-finished state, so I can share them during the long, hot days ahead. This one was completed about a month ago, but I saved it for the dreariest day imaginable to try to take crappy cell-phone pictures in a room that already doesn't get a ton of light. I'm so smart and good at this!!

Our guest room has been the most transitional room thus far. We had planned on it being an office. It already had a massive desk in there left by the previous owners, so I originally styled it as an office and packed the closet with my obscene amount of craft supplies. And then we never used it. The only time I ever set foot in there was to fetch something from my craft closet.

Then a few months ago, I experienced a lengthy bout of insomnia. When that happens, I have two options- lay in bed, angry and awake, listening to my husband snoring while plotting his gruesome murder or go share the couch with the dog. Neither one of those was particularly appealing, and we had that whole room, just wasting away... A quick trip to Sam's for a twin mattress and box spring turned our unused office into a guest room/sanctuary from snoring.

It still lacked style, and paint. So once I had finished painting every other room in the house, it was time to tackle this one. But choosing a color was tough. I had originally thought a light periwinkle might be nice, but I was wrong. It was more of a lilac nightmare. A leftover can of light blue from the twins' room was a bit too nursery-like. I finally decided to use the same blue that I have in the kitchen and living room (SW Interesting Aqua). It's a grown-up blue that's not too dark, and since the guest room is filled with cast-offs from the living room (curtains, rug, lamps), I knew they would work together.

A couple of coats of paint later, we had a fun, eclectic room that has a lot of personality. It might be filled with cast-offs and art that doesn't work anywhere else, but it's all stuff that I love and couldn't bear to part with.  I have a place to store my collection of dollhouses (I'm a miniatures junkie- more on that later), and we finally have a place to display the concert flyers we've started collecting over the past couple of years.

(Sidenote- We are total concert junkies. I thought that made us kind of cool and fun, but then I started looking around at the audience at our last few shows. You know who goes to concerts? Middle-aged people trying to reclaim their misspent youth. We're not cool- we're a cliche'! But that's okay because we're cliches that have seen some kickass bands.)

As promised, here are those poorly-lit cell phone pictures. It may not be the showplace of our home, but I like it. And at least I have a refuge from snoring that might just save my husband's life!


 I loved this fun colorful quilt. 
The fact that it was $20 made me love it more.

The wall of music is still a work in progress!
These are only from the last year or two. 
Yes, that is a trailer dollhouse.
The inside is as awesome as the outside.


                                    Stuff I love, like this reclaimed wood chest from India,
my quarter scale dollhouse that I'm absurdly proud of,
and my chipmunk art studio that's just funny.

Tuesday, June 13, 2017

Make This for Dinner- Mushroom Ravioli Lasagna

It's summer- no one wants to cook anything complicated. In fact, I believe that the vast majority of summer foods should be eaten cold or grilled. But sometimes it's too hot and muggy to light the grill. Or maybe you don't feel like being carried off by bird-sized mosquitos while you cook dinner. For those nights, I'm giving you this ridiculously easy, fairly cheap, kid-approved dinner. This is just my variation- there are million similar recipes on hand, and you should feel free to customize it based on your family's tastes, and what you have in your pantry.

Ingredients:
2 bags mushroom ravioli (look in the refrigerated section of your grocery store)
1 jar marinara sauce
1 cup thinly sliced mushrooms
2 thinly sliced tomatoes
1/4 cup chopped basil
2 cups shredded mozzarella
1/2 cup shredded parmesan
salt and pepper

Now, try to keep up. This is a very complicated process that will take you approximately five whole minutes!!

In a glass baking dish (I used 8x8) spread a thin layer of marinara sauce, top with a layer of ravioli. Sprinkle mozzarella and parmesan on top (maybe a half cup of mozzarella? 3/4 of a cup? Enough to cover it, but not bury it. You'll need enough for 2 more layers.)
Top cheese layer with sliced mushrooms, then tomato slices (sprinkle with salt and pepper to taste), then the chopped basil.
Cover with another layer of mozzarella and parmesan.
Follow with a second layer of mushroom ravioli and another layer of marinara sauce.
Top with a final layer of mozzarella and parmesan and bake at 350 for 35-40 minutes.

Y'all- this was SO GOOD. My entire family- including my pickiest kid- devoured it.This is all that was left:


 And you can make it ahead of time and pop it in the oven when you're ready. Spend all afternoon at the pool, because dinner will be a cinch!

Tuesday, June 6, 2017

Spray Paint- A How Not-to Guide

Today is our house-iversary!! One year ago today we closed on our beloved casa and began the process of making it our dream house. I had this whole post planned where I would have all these great pictures of all the changes we've made over the year, but it's summer and I have three boys, and upstairs looks like it's been taken over by squatters. I don't even go up there. Seriously- it's too horrifying. I just leave Boyland to them and I live on the clean first floor of the house. So yeah, maybe we'll get to those pictures sometime in the future.

In the meantime, I'm going to tell you a story about how stupid I am, but only if you promise not to tell my husband. I don't have to worry about him finding out here because he doesn't read my blog. He says, "I don't need to read it- I live it." So this little snafu needs to stay between us.

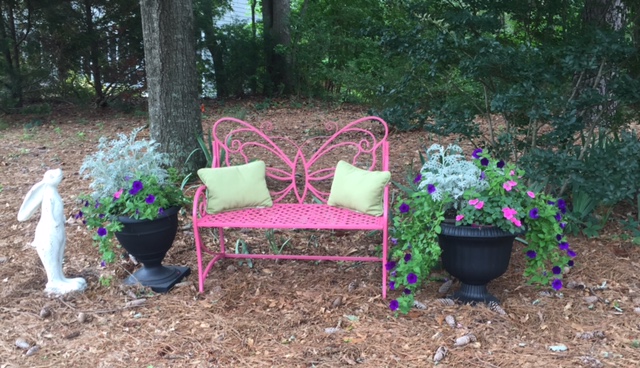
Yesterday I decided to paint a little metal bench that I had out in the yard. It was looking pretty tired, and what could possibly make it more cheerful than a coat of bright pink spray paint? There was a good chance of rain in the afternoon, so I decided to paint it in the garage. No big deal, I've done that before. But this time I decided not to bother moving my car. After all, I was several feet away- it would be fine, right? Well, it might have been fine if I didn't have a huge fan going to help with ventilation. But since I did, I got an unfortunate surprise when I was finished.

I stepped back to admire my cheerful pink bench,
Cute, right?? 
Then I looked around and noticed that everything around me had a fine, powdery coating of pink. I wondered if my car did, but it was hard to tell in the dim light. I ran my hand over the side and it felt powdery and came back vaguely pink. So I thought, "hmm, I'd better rinse this off before it sets."

When I backed it out in the driveway, it still didn't look too bad. Maybe it had a slight pinkish cast? Then I walked around it to find wherever the sun hit it, wherever the light caught it at an angle, it was a definite iridescent pink. I'm not going to lie, it was actually kind of cool, and I thought briefly about leaving it. But I figured that would not go over well with the aforementioned spouse, so I decided I'd better rinse it off. No big deal- except that when it dried, it was still pink....

I started to get a bit panicky at this point. I had twenty minutes until I had to leave to get to an appointment and I had a pink minivan. What the hell was I going to do???There was no time for a real car wash, so I had to give my car a frantic sponge bath in a desperate attempt to remove all evidence of stupidity. Thankfully it worked, and I headed off to my appointment with a sigh of relief.

That lasted until I got home and realized that the garage floor was sporting a delightful coat of pink mist. Hubs would probably not be thrilled about that either (though he'd be happier than he would if the car still looked like a rolling blob of cotton candy.) It swept out fairly easily, though there's still a pink patch where I actually painted it. But that's no big deal, because I paint in there frequently, and the floor is already a Rorschach test of previous projects. My secret is safe- as long as you guys don't tell him. And I have learned a valuable lesson- ALWAYS MOVE THE CAR!!!

I'll leave you with that good advice, and this picture to commemorate our very first house-iversary.


Tuesday, May 30, 2017

From Aspiration to Inspiration

My husband and I spent this past weekend in the beautiful city of Savannah. If you've never been there, it almost defies description. Gorgeous, ornate old row houses, historic homes everywhere you look, live oaks draped in spanish moss- it is truly one of the prettiest places you could ever visit. It's also only a three-hour drive, which makes it perfect for a quick getaway.

We had lots of fun strolling through the squares, perusing the shops and art galleries, and eating in fantastic restaurants. But the highlight of our trip was easily the apartment that we rented. It was GORGEOUS!! It was on the first floor of a converted row house, so it had all the high-ceilinged charm you could ask for. And the colorful, eclectic decor was right up my alley. I literally circled through that house about 20 times, just looking at all the amazing art, and admiring the way they'd paired formal with casual to create an interesting, elegantly whimsical space. I kept telling my husband "This is how I would decorate if we had money!! (Take the full tour at http://www.southernbellevacationrentals.com/vacation-rental-home.asp?PageDataID=99477  Tell them I sent you!!)


The thing that I adored the most was a china cabinet in the parlor. It was filled with books, art and all kinds of interesting little objects. It was a literal feast for the eyes, and I wanted it. Bad.


We got home Sunday afternoon, and I found myself wondering how to incorporate some of that Savannah style into my house. Problem is, I've spent the last year doing every room- I couldn't start over, right? Well, no, not on a large scale. But there was a small room that could use a makeover....

Our downstairs powder room was one of the first rooms I painted. It's tiny, so I wanted a bold, saturated color. I wanted to turn it into a little jewel box of a room, but when it was done, I felt like my efforts had fallen flat. The robin's egg blue paint was just a bit on the tacky side, and I never felt like everything came together, but I didn't know how to make it better. Until Sunday.
This is the most accurate representation 
of color. My cell phone photography is lacking.


All of a sudden, I knew what that room needed! It needed a dark, rich paint, and I had just the color. Benjamin Moore Calypso Blue. I fell in love with this one a few years ago after seeing these pictures.

 I even used it in the master bath in our old house. It was time to bring back my beloved dark, teal blue.
But what to do about my need for charming antique objets de' art? That was easy. I spent an hour in two of my very favorite antique/junk shops, and I procured everything you see here for $30. The cabinet was $20, and all the tchotchkes, (minus the Titanic model, glass bottle, and rose paperweight that I already owned) and the two framed pictures were $10. I feel like we need to take a moment to honor my fierce junking skills. 


I started painting Monday afternoon, and here we are 24 hours later.
The color is far more teal in real life-
much like the inspiration bathroom.


 I'm 100% in love with it. I wish I could pee standing up so I could admire my cabinet of delightful curiosities every time I visited that room. The dark color makes it seem cozy, and it makes the antiques and the snazzy gold mirror (thanks, mom!) pop. It's hard to get great pictures since the room is the size of the handicapped stall at your local gas station bathroom, so you'll just have to trust me. But it's finally the little jewel I knew it could be. Now if I can just keep the boys from peeing on the wall...